What is Decoupage Kitchen Decor?
Decoupage is the art of decorating an object with paper cutouts, then sealing them with varnish or lacquer. This transforms ordinary items into stunning pieces of art. In the realm of kitchen decor, decoupage offers a unique way to personalize your space, adding charm and character that reflects your style. From adding patterns and images to any surface, decoupage transforms the utilitarian into the artistic. This guide explores the world of decoupage kitchen decor, providing everything you need to know to get started and create a kitchen you’ll love. This craft is cost-effective, offering a creative outlet to breathe new life into existing items, adding personality to your home.
Benefits of Decoupage Kitchen Decor
Decoupage kitchen decor brings several benefits, making it a fantastic choice for any home. Firstly, it’s a cost-effective way to refresh your kitchen without a complete remodel. Old cabinets, countertops, and even appliances can be given a fresh look at a fraction of the cost of buying new. Secondly, decoupage is incredibly versatile. You can create any design, from vintage patterns to modern art, perfectly tailored to your kitchen’s style. Thirdly, it encourages creativity and personalization, allowing you to express your individual taste and make your kitchen truly unique. The process is also a great way to unwind and engage in a relaxing craft project. Additionally, decoupage often involves upcycling, turning old items into something beautiful, which is environmentally friendly.
Creating Decoupage Kitchen Decor [Step-by-Step]

Creating decoupage kitchen decor is a rewarding process that involves several key steps. Start by choosing your project – a cabinet door, a countertop, or perhaps even a decorative tray. Next, gather your materials: decoupage paper or fabric, adhesive, sealant, brushes, and the item you plan to decorate. Proper surface preparation is crucial. Clean the surface thoroughly and sand it lightly to ensure the adhesive sticks properly. Then, carefully cut or tear your paper or fabric designs, arranging them on the surface. Apply the adhesive, positioning the cutouts, and smoothing out any bubbles. Finally, seal the project with multiple coats of varnish or lacquer to protect the design and provide a durable finish. This methodical approach ensures a beautiful and long-lasting result.
Choosing Materials for Decoupage Kitchen Decor
Selecting the right materials is essential for successful decoupage kitchen decor. The choice of paper or fabric is a significant decision. Consider using high-quality paper designed for decoupage, which is less likely to tear and fades less quickly. Fabric, especially cotton or linen, offers a more textured look. For adhesive, choose a decoupage glue specifically made for this purpose. It serves as both the adhesive and the sealant. Brushes are critical; opt for soft-bristled brushes to avoid leaving streaks. When it comes to sealants, water-based varnishes are a good option for durability and ease of use. Always check for food-safe and heat-resistant properties, especially for surfaces that come into contact with food or heat. Furthermore, consider the design you want to create and choose materials that will complement that aesthetic.
Selecting Decoupage Kitchen Decor Projects
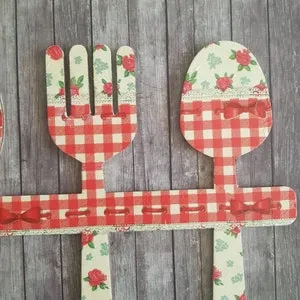
There’s a wide range of decoupage kitchen decor projects to choose from, offering something for every skill level. For beginners, consider starting with small projects like decorating trays, placemats, or wooden utensils. These are easy to handle and provide a quick sense of accomplishment. Intermediate crafters can move on to decorating cabinet doors, adding a decorative border to countertops, or creating custom storage boxes. For more advanced projects, consider decoupaging appliances or a backsplash. Each project can breathe new life into your kitchen, transforming it into a unique space. The key is to start with simple projects and gradually work your way up to more complex ones as your skills improve. Always plan your design and measure the surfaces to avoid mistakes and ensure a cohesive look.
Preparing the Surface for Decoupage

Proper surface preparation is the foundation for any successful decoupage project. Start by cleaning the surface thoroughly, removing any dirt, grease, or old finish. Use a degreasing cleaner for kitchen surfaces to ensure proper adhesion. Next, lightly sand the surface to create a textured surface for the adhesive to bond to. This is especially important for glossy surfaces. After sanding, wipe away any dust with a tack cloth. For surfaces that are painted, ensure the paint is fully dry and adheres well. If the surface is damaged or has loose areas, repair them before starting. These steps are vital for the long-lasting results of your decoupage. Neglecting these steps can lead to peeling, bubbling, or poor adhesion of your chosen designs, so take your time and prepare well.
Applying the Decoupage Paper or Fabric
Once your surface is prepared, it’s time to apply the decoupage paper or fabric. Measure and cut your chosen design to fit the surface, keeping in mind the pattern and the overall look you want to achieve. Apply a thin, even layer of decoupage glue to the surface. Carefully position your paper or fabric, smoothing it out with your fingers or a soft brush, working from the center outwards to eliminate bubbles. If using multiple pieces, overlap the edges slightly. Ensure all the edges are firmly adhered. After the paper is in place, gently brush another layer of decoupage glue over the top to seal it. Be patient and take your time to avoid wrinkles or air bubbles, which could detract from the finished look. Any imperfections here will be visible in the end result, so make sure the process is done as smoothly as possible.
Sealing and Finishing Your Decoupage
Sealing and finishing is a crucial step in decoupage, protecting your design and giving it a professional look. Allow the glue to dry completely, usually several hours or overnight. Then, apply multiple coats of sealant, such as varnish or lacquer, allowing each coat to dry before applying the next. This builds up a protective layer that safeguards the decoupage from moisture, heat, and everyday wear and tear. Sand lightly between coats with fine-grit sandpaper for a smooth, even finish. The number of coats depends on the project, but three to five coats are usually recommended. Choose a finish that complements your design and kitchen style – matte, satin, or gloss. The final sealant coat should be applied with extra care for a perfect finish. Proper sealing is key for making your decoupage kitchen decor durable and easy to clean.
Decoupage Kitchen Decor Ideas

The possibilities for decoupage kitchen decor are endless, allowing you to infuse your space with personality and style. Consider decoupaging cabinet doors with patterned paper or fabric. This is a simple yet impactful project. Create a custom backsplash using decorative tiles and decoupage techniques. Add a unique touch to your countertops by decoupaging them with specialized paper or fabric, then sealing them for durability. Decorate kitchen utensils, spice racks, or canisters. Revamp your refrigerator with a fun design, or create themed serving trays for parties. Personalize cutting boards with beautiful images or patterns. The key is to choose designs and materials that align with your kitchen’s aesthetic and reflect your personal style. Decoupage is an excellent way to upcycle old items, reducing waste and adding charm to your home.
Decoupage Kitchen Decor Projects for Beginners
For beginners, starting with simple decoupage kitchen decor projects is the best approach. Begin with small items like wooden trays, placemats, or coasters. These projects are less intimidating and offer a quick learning curve. Another great project is decorating plain glass jars for storing spices or utensils. Applying decoupage to old, plain kitchen utensils can instantly give them a new look. Consider customizing cutting boards with your favorite designs. Using self-adhesive vinyl or paper on the inside of drawers or shelves is also a great beginner project. Choose easy-to-handle materials and techniques. Following simple tutorials and not being afraid to experiment are the keys to getting started. As you gain confidence, you can move on to more complex projects.
Decoupage Kitchen Decor for Advanced Crafters
For advanced crafters, decoupage kitchen decor offers a wide range of challenging and rewarding projects. Consider decoupaging entire cabinet sets, which can transform a kitchen’s appearance. Creating a decoupage backsplash using custom tiles is another advanced option. Decoupaging appliances, like refrigerators or dishwashers, can give them a unique and personalized look. Experiment with three-dimensional decoupage techniques to create unique textures and effects. Consider combining decoupage with other crafts like painting or mosaic work. Another advanced project involves creating custom murals on kitchen walls or islands. The key is to combine creativity, technical skill, and a keen eye for detail. These projects offer significant opportunities to showcase skills and create stunning, personalized spaces.
Maintaining Your Decoupage Kitchen Decor

Proper maintenance is key to preserving your decoupage kitchen decor and ensuring its longevity. Regularly clean the surfaces with a soft cloth and a mild cleaning solution, avoiding abrasive cleaners that could damage the sealant. For countertops or high-use areas, clean spills promptly to prevent stains. Use placemats, trivets, and cutting boards to protect surfaces from heat and scratches. Periodically inspect the decoupage for any signs of wear and tear, such as peeling or bubbling. If any damage is found, address it immediately. Depending on the type of finish used, you may need to reapply the sealant after several years. Careful handling and regular cleaning will ensure that your decoupage decor continues to look its best for years to come.
Troubleshooting Common Decoupage Issues
Even with the best intentions, decoupage projects can sometimes face challenges. One of the most common issues is air bubbles. These can be avoided by smoothing the paper or fabric carefully and using a soft brush. Another problem is wrinkling, which can be minimized by not using too much glue and working quickly. Peeling is often caused by improper surface preparation or not using enough sealant. Ensure surfaces are clean and well-sanded before beginning. For colors bleeding, apply a coat of sealant before adding additional layers. If the paper tears, try using a slightly thicker paper or fabric. Always test your materials on a small, inconspicuous area first to avoid unexpected results. By understanding these common issues and troubleshooting techniques, you can ensure a smooth and successful decoupage experience.