Top 7 DIY Kitchen Decor Ideas
Are you dreaming of a kitchen makeover but hesitant about the cost? Look no further! This article unveils the top 7 DIY kitchen decor ideas that will transform your space without breaking the bank. From simple upgrades to more involved projects, these ideas are perfect for adding personality and functionality to your kitchen. Each idea offers a unique way to enhance your kitchen’s aesthetic while reflecting your personal style. Get ready to roll up your sleeves and create a kitchen you’ll love to cook and entertain in. These projects are designed to be accessible, so you can start making a difference today. Whether you’re a seasoned DIYer or a beginner, there’s something here for everyone. Embrace the joy of creating and enjoy the satisfaction of a beautifully decorated kitchen. Let’s dive into the exciting world of DIY kitchen decor and discover how you can breathe new life into your cooking space!
Open Shelving DIY for Kitchen
Open shelving is a fantastic way to add a modern touch and make your kitchen feel more spacious. This DIY project involves installing shelves without doors, creating an airy and inviting atmosphere. Open shelving is not just about aesthetics; it also provides easy access to your frequently used items, making cooking and meal prep more convenient. This project is a great way to showcase your favorite dishes, cookbooks, and decorative items. The process typically involves measuring, cutting wood, installing brackets, and securing the shelves to the wall. It is essential to choose sturdy materials that can support the weight of your items. Consider the style of your kitchen and select shelves that complement your existing decor. With open shelving, you can create a functional and stylish storage solution that elevates the overall look of your kitchen. Proper installation ensures the shelves are safe and secure for daily use.
Benefits of Open Shelving

Open shelving offers numerous benefits, including enhanced aesthetics, improved accessibility, and increased storage. The open design makes your kitchen feel more open and less cluttered, creating a more welcoming environment. Items are readily accessible, eliminating the need to rummage through cabinets and speeding up your cooking process. Furthermore, open shelving encourages you to display your items in an organized and visually appealing manner, adding character and personality to your kitchen. It’s also an affordable alternative to installing new cabinetry, allowing you to update your kitchen without a significant investment. Open shelving encourages you to keep things tidy and organized, as everything is on display. This feature provides the opportunity to easily see and grab what you need at any given time, making it a practical solution for busy kitchens. The open design promotes a modern and uncluttered aesthetic, while also being highly functional.
How to Install Open Shelving
Installing open shelving involves careful planning and execution. First, measure the space and determine the number and size of shelves you need. Next, choose your shelf material (wood, metal, etc.) and the appropriate brackets. Locate the wall studs to ensure the shelves are securely mounted. Using a level, mark the positions for the brackets on the wall, and then drill pilot holes. Attach the brackets to the wall using screws that are appropriate for your wall type. Once the brackets are securely in place, place the shelves on the brackets and secure them with screws or other fasteners. Always double-check the level of the shelves to ensure they are straight. Remember to consider the weight capacity of the shelves and choose appropriate materials accordingly. For a professional look, consider finishing the shelves with paint or stain to match your kitchen’s decor. Proper installation ensures your open shelving is both stylish and safe.
Chalkboard Wall DIY Kitchen Decor
A chalkboard wall is a fun and functional addition to any kitchen. It provides a creative space for writing grocery lists, leaving messages, or displaying artwork. This DIY project can be as simple as painting a small section of a wall with chalkboard paint or covering a larger area. A chalkboard wall adds a touch of personality and allows you to personalize your kitchen decor with ease. This is a great project to involve the whole family, as it offers a shared space for creative expression. Chalkboard walls can also be used for meal planning, creating weekly menus, or simply adding decorative elements. There’s no limit to what you can do, making this a versatile and engaging DIY project. The installation of a chalkboard wall can be completed in a weekend, making it a manageable and rewarding project.
Why Use a Chalkboard Wall

Chalkboard walls offer numerous advantages, including their functionality, aesthetic appeal, and interactive nature. They provide a practical surface for writing notes, reminders, and messages. They are visually interesting and can be customized to fit any kitchen’s style. Chalkboard walls serve as a canvas for creativity, allowing you to change the design as often as you like. They are also an excellent way to involve family members in kitchen activities, like meal planning. Chalkboard walls become the centerpiece of your kitchen decor, transforming an ordinary wall into a dynamic focal point. The versatile nature of chalkboard walls allows for easy updates and changes, making them a cost-effective and flexible decorating choice. From displaying artistic creations to organizing daily tasks, chalkboard walls will add a personal touch to your kitchen.
Creating a Chalkboard Wall
Creating a chalkboard wall is a straightforward process. First, prepare the wall surface by cleaning and sanding it. Apply a primer to ensure the chalkboard paint adheres properly. Then, apply two to three coats of chalkboard paint, allowing each coat to dry completely. Once the paint is dry, condition the chalkboard surface by rubbing chalk over the entire area and wiping it off. This helps to prevent permanent marks when you first start writing. You can frame your chalkboard wall with trim for a more polished look. Consider using different colors of chalk to create vibrant and eye-catching designs. Always ensure the area is well-ventilated during painting. With these simple steps, you can easily create a chalkboard wall that adds a touch of charm and utility to your kitchen.
DIY Kitchen Decor with Mason Jars
Mason jars are incredibly versatile and affordable for kitchen decor. They can be used in various creative ways, from storage containers to decorative vases. Mason jars can be painted, decorated with ribbons, or used as candle holders. The possibilities are endless. This DIY project offers a chance to repurpose and upcycle items, giving them a new life in your kitchen. Mason jars can easily match any decorating style and can be customized to fit your needs. This DIY project is simple, inexpensive, and eco-friendly. Involve the entire family in decorating the mason jars and create a unique and personalized kitchen style.
Uses of Mason Jars in Kitchen Decor

Mason jars have endless uses in kitchen decor. They can be used for storing dry goods like pasta, rice, and beans, keeping everything organized and visually appealing. Mason jars can also be repurposed as vases for fresh flowers, adding a touch of nature to your kitchen. They make charming candle holders, creating a warm and inviting atmosphere. Use them as utensil holders, adding to your kitchen’s overall functionality. Mason jars can be creatively painted to match your kitchen decor. Incorporate mason jars as a decorative element and as a practical solution for storage. This simple and cost-effective project allows you to add personal style and functionality to your kitchen.
Decorating with Mason Jars
Decorating mason jars is a simple and fun DIY project. You can paint them with acrylic paints, creating unique designs and color combinations. Wrap ribbons, twine, or lace around the jars for a rustic or elegant look. Add labels to the jars to identify their contents, combining aesthetics with practicality. Fill them with decorative items like beads, stones, or seasonal accents. You can also turn them into candle holders by adding tea lights or small candles inside. Feel free to get creative with stencils, glitter, or decoupage techniques to personalize your mason jars. The ease with which you can decorate these jars makes this a perfect project to start with. Make sure the colors and textures will fit your kitchen’s overall style.
DIY Kitchen Backsplash Ideas
A backsplash can instantly transform the look of your kitchen, adding personality and protecting your walls from spills and splatters. Several DIY options are available, from peel-and-stick tiles to painted backsplashes. This project allows you to add a unique design element to your kitchen without a significant investment. Consider the style of your kitchen and choose materials that complement your existing decor. Backsplashes can be customized with a variety of materials and designs. This simple upgrade can dramatically impact the overall aesthetic of your kitchen. Backsplashes are easy to clean, making them a practical and stylish addition.
Backsplash Material Options

There are several materials to choose from for a DIY kitchen backsplash. Peel-and-stick tiles are a convenient and affordable option that is easy to install. Ceramic or porcelain tiles offer durability and a wide range of design options. Consider using mosaic tiles for a detailed and visually interesting look. For a more budget-friendly option, you can paint the backsplash with a special paint designed for kitchen use. Use beadboard or shiplap to create a rustic or farmhouse-style backsplash. Make sure you prepare the surface and use the right adhesives. Select materials that are waterproof, easy to clean, and resistant to stains. Keep in mind the overall design of your kitchen when selecting the material for your backsplash.
Backsplash Installation Tips
Installing a DIY kitchen backsplash requires careful planning and execution. Measure the area accurately to determine the amount of material needed. Prepare the wall surface by cleaning it and removing any loose debris. For tile installation, use the appropriate adhesive and spacers to ensure even spacing. Follow the manufacturer’s instructions for applying the adhesive and installing the tiles. Consider using a level to maintain a straight line. Apply grout to fill the spaces between the tiles. Make sure the grout is sealed to prevent moisture damage. For peel-and-stick tiles, ensure the surface is smooth and clean before applying. Take your time and don’t rush the process to ensure a professional and long-lasting result.
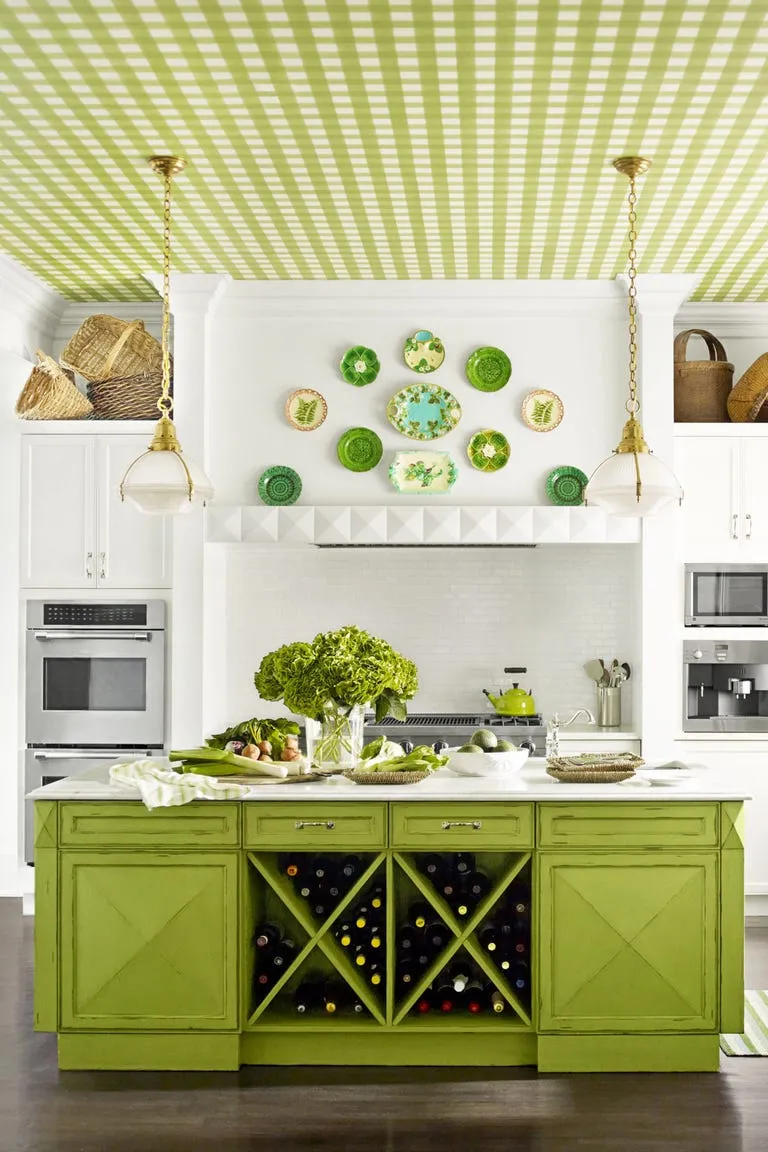
DIY Kitchen Island Ideas
A kitchen island provides extra counter space, storage, and a place to gather. If your kitchen is large enough, a DIY kitchen island is a rewarding project. The island can be built from scratch or by repurposing existing furniture. This project can significantly improve the functionality and appeal of your kitchen. A kitchen island is perfect for meal preparation, serving, or as a breakfast bar. You can customize the design to fit your specific needs and preferences. Creating a kitchen island allows you to make better use of available space, making it an excellent investment for anyone looking to enhance their kitchen.
Advantages of Kitchen Island

A kitchen island offers several advantages, including increased counter space for food preparation and serving. It provides additional storage space for cookware, dishes, and other kitchen essentials. The island serves as a gathering spot for family and friends, creating a social hub within the kitchen. Kitchen islands can also incorporate appliances, such as a sink or cooktop, enhancing the kitchen’s functionality. It adds aesthetic appeal and visual interest, improving the overall design of your kitchen. A kitchen island allows the homeowner to work more efficiently and offers convenience for everyday use. With a kitchen island, you can organize your kitchen more efficiently and keep your belongings in order.
Building a Kitchen Island
Building a kitchen island requires careful planning, measuring, and woodworking skills. Start by choosing the design and size of the island based on your kitchen space. Gather the necessary materials, including wood, screws, and hardware. Cut the wood according to your design plans. Assemble the island’s frame, then add the countertop. Add storage solutions such as drawers, cabinets, or open shelves. If you are repurposing an existing piece of furniture, modify it to fit your kitchen needs. Consider adding electrical outlets or a sink, if desired. Finish the island with paint, stain, or a protective coating. Remember to follow all safety precautions, particularly when using power tools. The right equipment will allow you to build a fully customized kitchen island.